Solar System Performance & Troubleshooting Guide
for Colorado’s Front Range

Whether you are managing a residential rooftop array or overseeing commercial solar panel configurations, keeping your solar system at peak performance is essential to secure your long-term clean energy investment. When technical faults or extreme Colorado weather events occur, performing an efficient, systematic check is your best line of defense.


This guide provides a direct Standard Operating Procedure (SOP) for basic solar panel troubleshooting, allowing you to safely diagnose system performance issues, resolve common inverter communication faults, and verify your net metering production before requesting an on-site service visit from our certified, in-house team.

How Do I Know if My Solar Panels Are Working Correctly?

You can verify your solar system’s health by checking for an active grid connection on your manufacturer’s monitoring app (such as Enphase Enlighten or MySolarEdge, depending on your setup) and confirming that your physical inverter display shows a solid green light. If your monitoring app shows an error or your electricity bill spikes unexpectedly, your array likely needs a systematic diagnostic review.

Standard Operating Procedure: Baseline Performance Check

Before adjusting any physical hardware or scheduling an on-site technical assessment, it’s best to first try these three passive system checks to determine your system’s operational readiness. This simple checklist applies to either a residential rooftop array or commercial solar panels.

Visual Symptom What Likely is Happening Recommended Action
App shows "No Data," Inverter is Solid Green, No Blue LED (SolarEdge inverters).

Enphase - No green light over the cloud arrow icon.
Internet/Wi-Fi router credentials changed or signal dropped. Power cycle your home Wi-Fi router or reconnect gateway. SE systems will require an on site visit to update the communication protocol and firmware.
App shows "Error," Inverter flashes Red/Amber Ground fault, grid voltage anomaly, or hardware failure. Proceed to brand-specific troubleshooting below.
App is Normal, Utility Bill Spiked 40%+ Module-level degradation or an isolated string outage. Can also be attributed to an increase in home energy consumption from added new electronic appliances (EV Chargers, Electric Ranges, A/C, etc). Application or utility bill review with our team. We will determine recommended action.

Brand-Specific Troubleshooting Steps

Mainstream brands like Enphase and SolarEdge represent approximately 90% of all solar systems that our service team typically sees throughout Colorado’s Front Range, though there are many other brands out there. Because our Pros are certified factory installation providers for both Enphase and SolarEdge, among others, we recommend using these safe, standard operating procedures (SOPs) to attempt a system reset before requesting professional repair. This can save you time and money if the issue can be fixed with a simple power cycling procedure.


Don’t see your solar inverter brand below? Reach out to our Pros for assistance.

Enphase Microinverter Systems

Enphase systems utilize small microinverters mounted directly underneath each individual solar panel. If your entire system is reporting an outage, which can be seen from your Enphase app, the issue typically resides within your main wall-mounted Enphase Combiner Box/backfed breaker or Envoy Gateway.

Locating & Understanding Your Enphase IQ Gateway

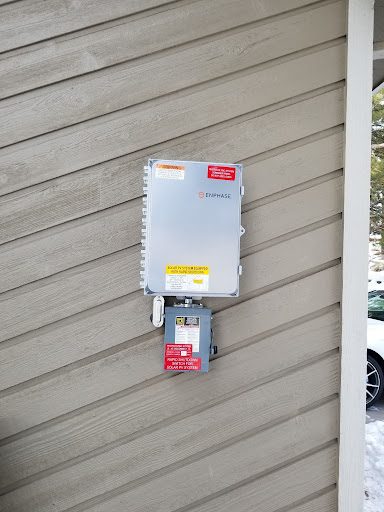
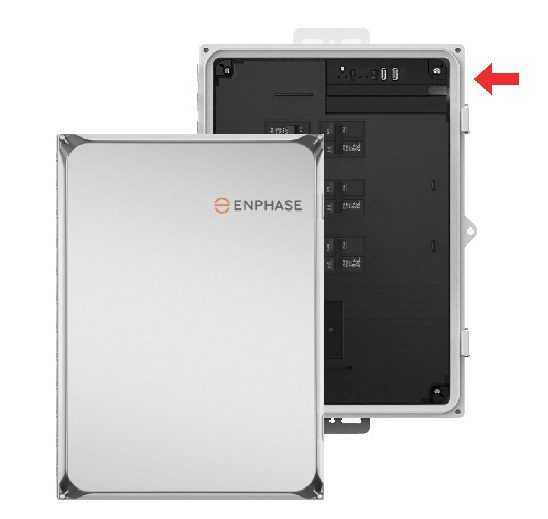
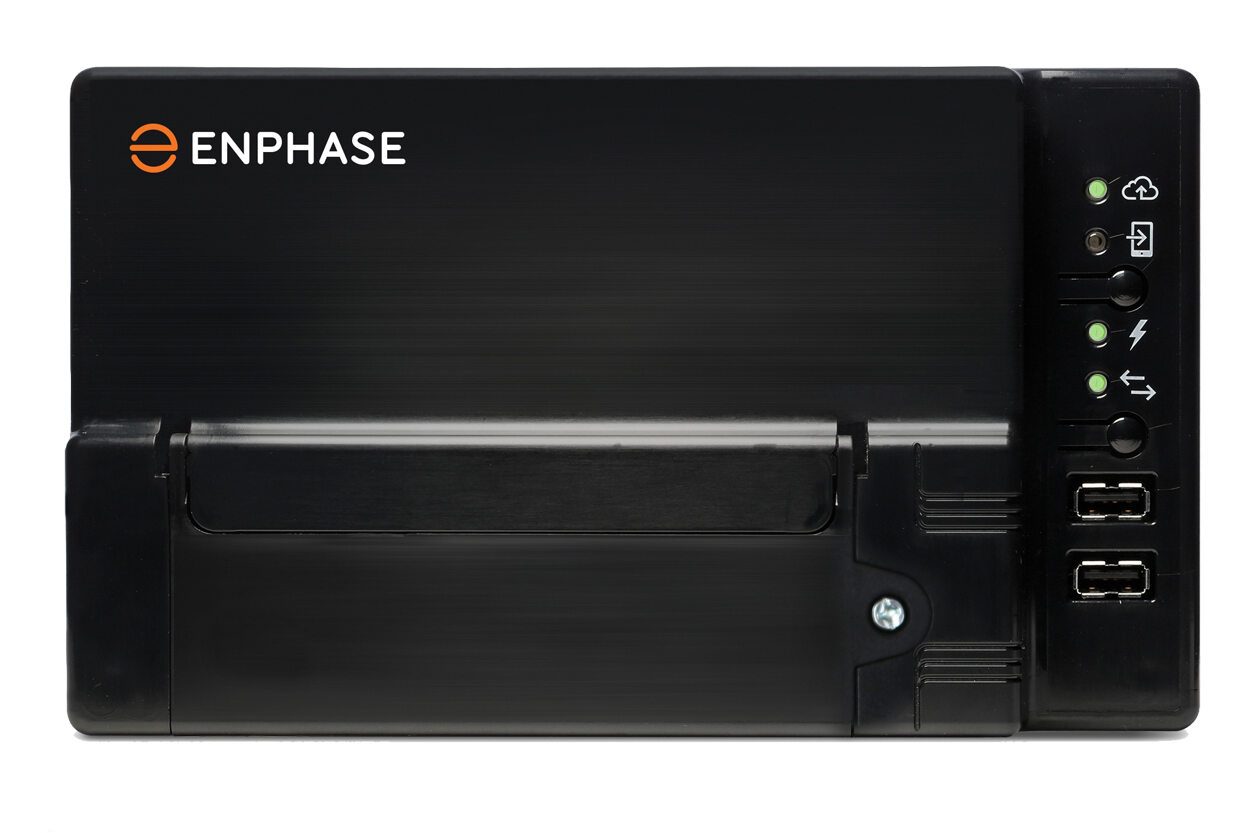
FIRST: Newer equipment is consolidated into the Enphase Combiner Panel Box (Enphase Branded), which is usually a gray, weatherproof box located near your main home electrical service panel or commercial electrical room. Open the box to find your Enphase IQ Gateway (Figure 1) or Envoy S (Figure 2) inside.

Enphase Gateway IQ combiner box installed on Colorado home | Solar Power Pros
Enphase Gateway IQ Combiner Box - Figure 1
Figure 1

Image Credit: Enphase

Enphase Envoy S - Figure 2
Figure 2

Image Credit: Enphase

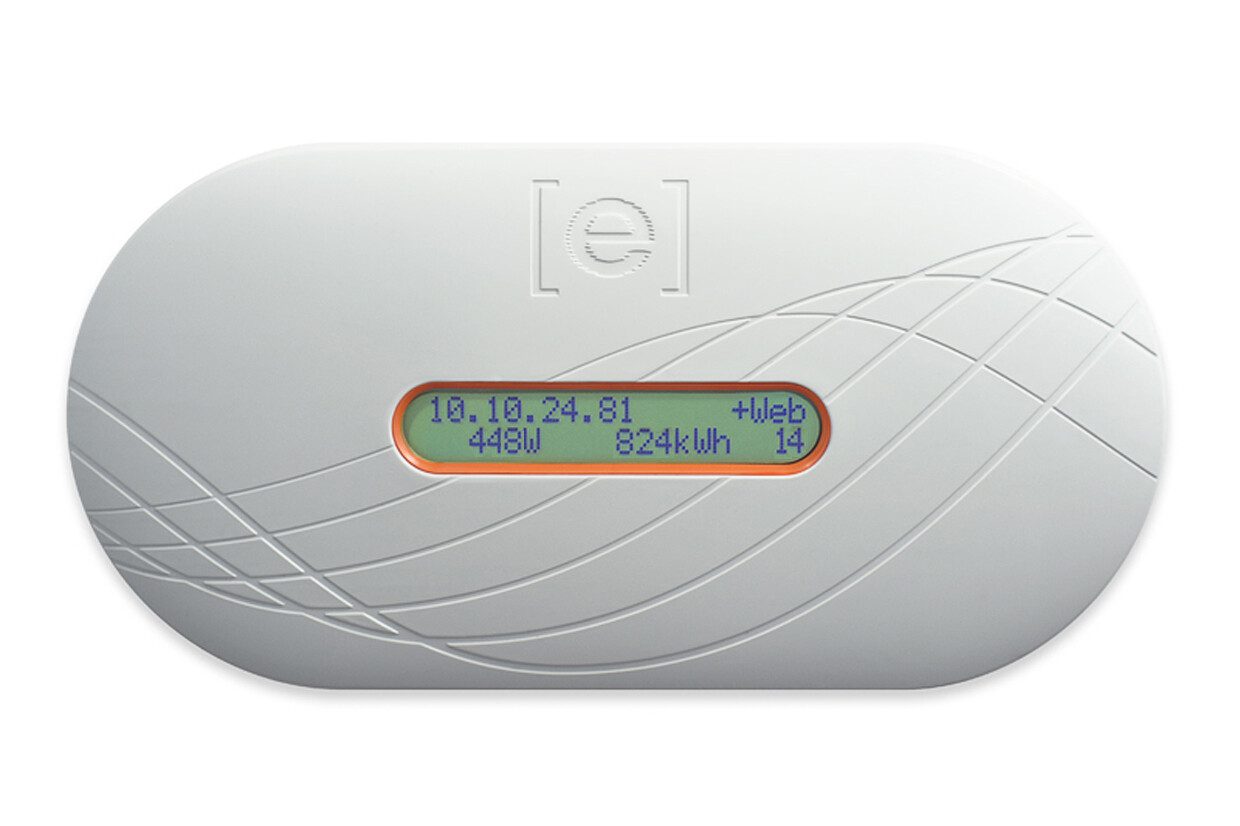
Note for legacy equipment: If your solar installation is older, you may not have a combiner box, but an oval-shaped Gateway LCD display (Envoy R pictured in Figure 3) that may be located near your internet router. If this is your setup, follow Enphase’s official, step-by-step Enphase LCD Envoy Reconnection Guide.


Have another setup? Find it on Enphase’s support page.

Enphase Envoy R Gateway LCD Display - Figure 3
Figure 3

Image Credit: Enphase

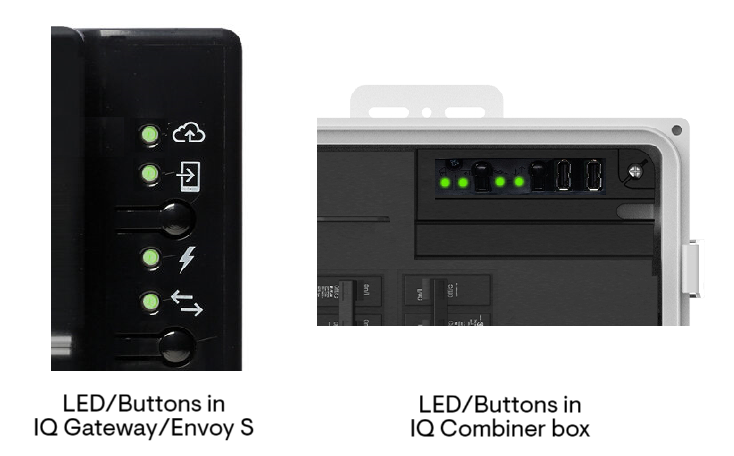
Step 1: Diagnose Your IQ Gateway LED Status

Before reconnecting the Wi-Fi, take a look at the face of your Enphase Gateway lights. (Figure 4)

Enphase Troubleshooting - LED lights on in IQ Gateway and Envoy S - Figure 4
Figure 4

Image Credit: Enphase

LED Status Pattern Hardware Diagnosis Required Action
All LEDs OFF or Flashing Red Power Interruption / Hardware Boot Issue Do NOT proceed to Wi-Fi setup. Instead, perform the Hardware Power-Cycle procedure below.
Top LED (Cloud Icon) Solid Green Fully Connected No action needed. System is online and actively reporting to the Enphase Cloud.
Top LED (Cloud Icon) Flashing Green Network Handshake in Progress Wait 3–5 minutes. Gateway is attempting to join your local network.
Top LED (Cloud Icon) Solid Amber or OFF Network Wi-Fi Disconnected Proceed to Step 2. Follow the Enphase App Wi-Fi reconnections steps below.
Top LED (Cloud Icon) OFF (Other LEDs ON) Wi-Fi Signal Lost Proceed to Step 2.Gateway does not have Wi-Fi connection.
How to Perform a IQ Gateway Hardware Power-Cycle (If All LEDs are Off or Flashing Red)

If all status lights are dark or continuously flashing red, your Gateway is either not powered or experiencing a boot sequence interruption. This could also be associated with a hardware issue (Combiner Motherboard Failure).

  1. Locate the Gateway Breaker:
    1. Inside IQ Combiner Box: Locate the dedicated Gateway circuit breaker (usually the middle breaker inside the enclosure).
    2. Standalone Gateway: These may have cords that are plugged into a power outlet. DO NOT USE A POWER STRIP. Direct connection to the outlet is needed.
  2. Perform a Hard Power Cycle: Flip the circuit breaker to the OFF position (or unplug the dedicated power cord if wall-mounted). Wait 30 seconds to allow for internal power to fully discharge.
  3. Restore Power: Flip the breaker back to the ON position (or plug the cord back into the power outlet for standalones).
  4. Watch the Boot Sequence: Give it up to 10 minutes for the Gateway to complete its boot cycle. If the Cloud LED turns Solid Amber or Off (while other LEDs light up normally), proceed to the app setup below. If lights remain dark or flash red indefinitely, your hardware requires diagnostic testing by an experienced technician.

If all LEDs remain completely off or continue flashing red for more than 10 minutes after the restart, your Gateway may need professional hardware testing. Contact our in-house service O&M team for diagnostic support.

Step 2: Manual Wi-Fi Reconnection Procedure

Don’t have a Wi-Fi connection? Visit Enphase’s site for Ethernet or Cell Modem connections or to find out what connection you utilize.


Re-establishing your Gateway’s internet connection is fastest and easiest through the Enphase App on your phone. Note: Before beginning the below process, it’s good practice to ensure your router is working. Perform a router restart—usually done by turning it off for 30 seconds (or unplugging) and back on (or plugging back in). Then once it’s had a chance to reboot (which can take several minutes), check that the Wi-Fi is working from your phone or other mobile device.

Video Credit: Enphase 

  1. Open Enphase App: Log in if you’re not already.
  2. Navigate to Gateway Device Settings: From the main dashboard, tap Menu (bottom right) > Settings > Connectivity
  3. Select Configure Wi-Fi: To connect your mobile device to your IQ Gateway, select Connect. You may have to retry a couple times if it doesn’t connect at first.
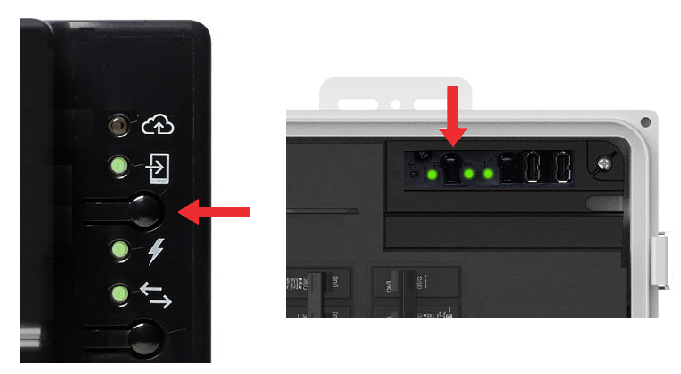
    1. If you can’t connect, try enabling AP Mode.
      1. On you IQ Gateway, briefly press and release (do not hold) the AP mode button. (If you accidentally pressed the button too long, just wait 2 minutes then try again). You’ll know its in AP Mode when the second light is solid green. (Figure 5)
      2. Back in your app, select Retry.
    2. When you connect, you may be prompted to select your Wi-Fi network and enter your Wi-Fi password. Then select Join.
  4. Confirm Connection Success: The app will display a confirmation message once connected. Check the Gateway physical panel—the top Network Communications LED (Cloud Icon) will turn solid green within 2 to 5 minutes.
Enphase Troubleshooting - AP mode button on IQ Gateway or Envoy S in IQ combiner box - Figure 5
Figure 5

Photo Credit: Enphase

Need Advanced Manual Setup or Help with AP Mode?

If you were unable to connect or are continuing to experience issues, you can review Enphase’s reconnection guide or try calling Enphase Customer Service for additional help: (877) 797-4743


Or you can reach out to Solar Power Pros team of experts to take a look.

SolarEdge Technologies: Understanding Inverter Status

SolarEdge systems centralize power conversion into a single, large inverter unit paired with DC power optimizers under each panel. Mounted near your main electrical service panel or commercial service room, this wall unit acts as the central hub for system communications and grid synchronization. Depending on the generation and model of your unit, system status is communicated either through a classic front-facing LCD screen or a streamlined set of LED indicator lights. Understanding which interface your SolarEdge inverter uses is the key to correctly reading its real-time diagnostic readings.

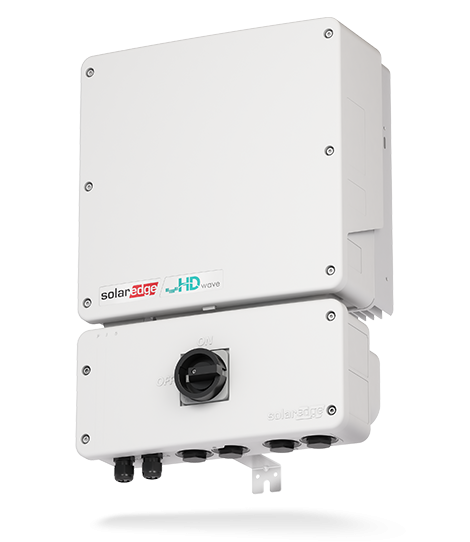
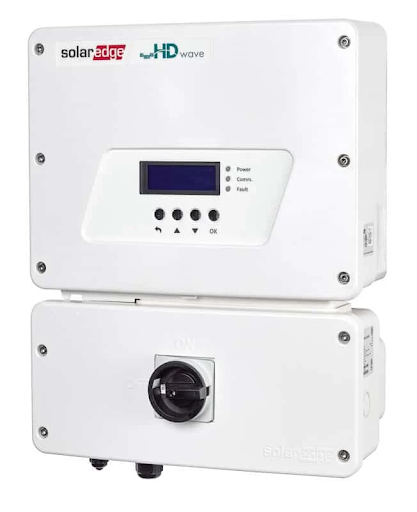
FIRST: Locate your inverter, which will likely be near your home’s electrical panel. SolarEdge systems feature two distinct generations of inverter hardware. To troubleshoot your system, first identify whether your inverter has a sleek, screenless face with small LED lights at the bottom (Figure 6), or an older, physical digital display screen (Figure 7).

SolarEdge screenless inverter beauty shot, front angled left
Figure 6

Photo Credit: SolarEdge

SolarEdge Inverter with LCD Display Screen
Figure 7

Photo Credit: SolarEdge

For Modern Screenless Inverters (No LED Screen)

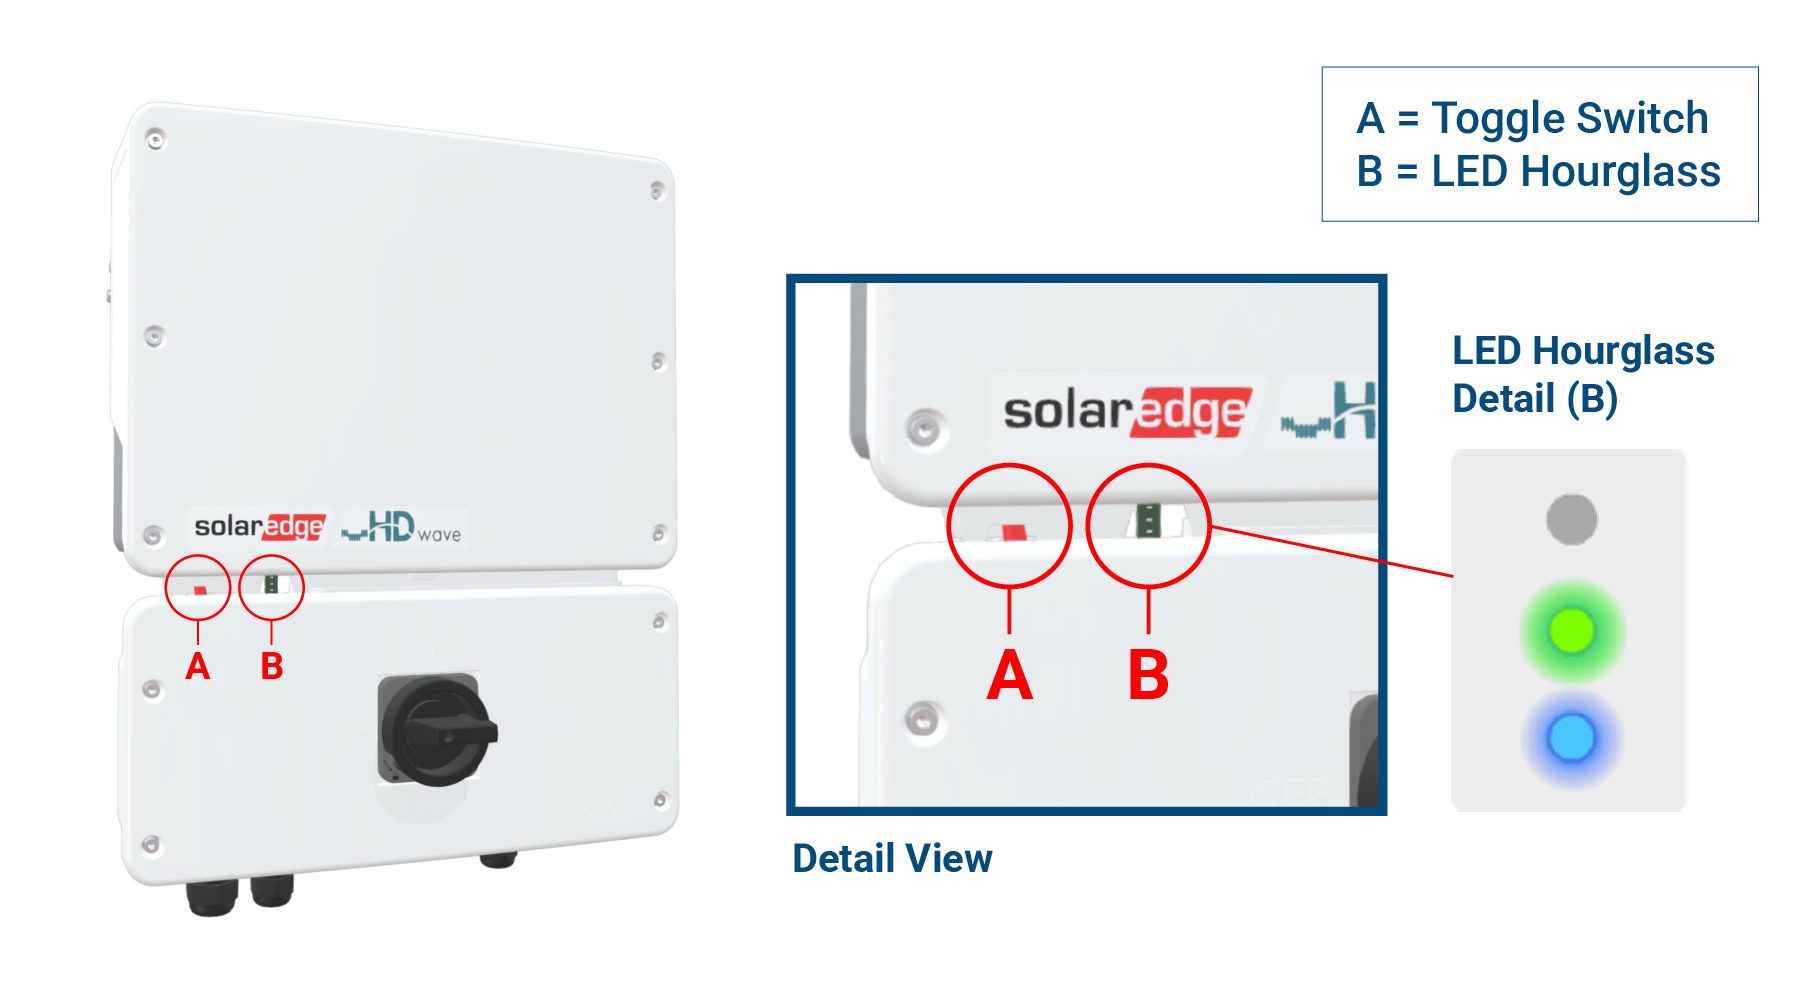
In the screenless SolarEdge Inverter diagram below (Figure 8), you’ll see a closeup view of the Toggle Switch (labeled A), which will be either red or black, and the LED Interface/Hourglass (labeled B), which will show three lights (labeled LED Hourglass Detail (B)).

SolarEdge_Screenless_Non-LED-Inverter_Diagram_Toggle-Switch-and-LED-Hourglass_V1
Figure 8

3D Model Rendering Photo Credit: SolarEdge

Diagnose Your SolarEdge LED Light Status
  • Green LED: Power Production
    • Solid Green: Your system is performing perfectly and generating power.
    • SolarEdge Green Light Blinking: The inverter is producing power normally, but it has temporarily lost its internet communication link. Your panels are still saving you money, but your tracking app cannot show real-time metrics until the connection is restored.
  • Blue LED: Network Communication:
    • Solid Blue: Your system is successfully connected to the SolarEdge monitoring servers.
    • Off: The local internet or cellular connection has dropped.
  • Red LED: System Fault:
    • Solid or Flashing Red: The system has logged an active fault (such as an AC grid surge or a ground isolation error) and has safely paused production.

For Legacy Inverters (LCD Screen Displays)

If your system features a physical digital LCD screen, you can wake up the display to read direct diagnostic messages. In some cases, the LCD Screen will no longer be legible due to sun exposure. If this is the case, reach out to our Pros.

SolarEdge Inverter with LCD Display Screen

Photo Credit: SolarEdge

  1. How to Wake the Screen: Gently tap the physical Up/Down touch sensor on the front of the housing, or press the single green button located on the underside of the inverter box.
  2. What to Look For:
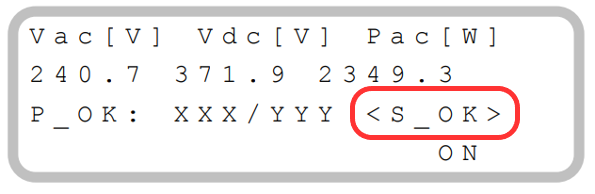
    1. Scroll through the status pages to the screen shown in Figure 9.
    2. If the screen displays <S_OK>, your communication link is active.
    3. Locate the line displaying Pac [W]—this shows the exact wattage of solar energy your system is producing in real-time. Any active system errors will display as a direct alphanumeric code (e.g., Error 18x3B).
SolarEdge LCD Screen with S_OK highlighted for troubleshooting purposes - Figure 9
Figure 9

Photo Credit: SolarEdge

When to Power Cycle vs. When to Call Our Pros

If your SolarEdge inverter screen displays an error code or a solid red fault light, the first and most effective troubleshooting step is to perform a system power cycle (reboot). A simple reset often clears minor communication or voltage glitches without needing a truck roll. 


However, if you see critical safety alerts—such as Isolation Faults (Codes 2×19, 18×58) or Hardware Errors—do not attempt a reset. These require hands-on diagnosis from a certified technician. If you see/hear/smell any type of thermal event, turn the inverter DC disconnect off (Black Dial on lower housing) & turn the AC Disconnect off immediately. A site visit is necessary in this scenario.

How to Safely Power Cycle (Reboot) Your SolarEdge Inverter

If your diagnostics point to a simple network freeze or minor system lag, follow this standard operating procedure (SOP) to drain and reset your unit’s internal capacitors safely.

  1. Toggle the Red Switch Off: Locate the red toggle switch on the bottom or side of your SolarEdge inverter (labeled P/1/0 or I/O). Push this toggle switch to the 0 (OFF) position to stop active power production.
  2. Shut Off the DC Safety Switch: Directly underneath the main inverter, locate the large black rotary dial (the DC Safety Switch). Turn this dial counter-clockwise to the OFF position to isolate the incoming direct current coming from your solar array.
  3. Flip the AC Solar Breaker: Locate your main home electrical panel (or external AC utility disconnect switch). Find the dual-pole breaker clearly labeled Solar or PV and flip it to the OFF position.
  4. Allow Full Capacitor Discharge (Wait 10 Minutes): Leave the system completely de-energized for a full 10 minutes. This is critical, as it gives the inverter’s internal heavy-duty capacitors ample time to discharge any remaining stored electricity safely.
  5. Re-energize in Reverse Order: Turn the system back on by reversing the steps precisely:
    1. Flip your AC Solar Breaker back to ON.
    2. Turn the DC Safety Dial clockwise to ON.
    3. Flip the bottom Red Toggle Switch back to the 1 (ON) position.
  6. Allow for 15-Minute Sync: SolarEdge systems are programmed with utility safety delays. Once turned back on, the LCD screen will light up and the system will run a series of self-tests. It can take up to 15 to 20 minutes for the system to fully boot, begin producing power (Pac climbing above 0), and re-establish server communication (<S_OK> appearing).

If your system displays a persistent error message or fails to resume production after this sequence, here’s your options. You can review SolarEdge’s reconnection guide or reach out to let our factory-certified, in-house solar repair team manage the diagnosis process for you.

System Ownership & Service Continuity: Existing Customers vs. Third-Party Arrays

Protecting your solar investment over its 30+ year lifespan calls for an honest, long-term partner. Operating on our core values of Respect, Integrity, Service, and Drive, the Solar Power Pros in-house service department is focused on safety and system readiness—not high-pressure sales. Whether we are supporting our existing customers or assessing and repairing for a third-party array, we deliver objective, transparent diagnostics.

Service Continuity for Existing Customers

For your initial installation, it’s important to choose an experienced solar company with long-term roots in the community that employs its own service department. Solar Power Pros is able to assess our Customer installations more quickly and efficiently because we have all the background (and in many cases the installers’ first-hand knowledge) and schematics of the property and array.


When you trust our certified, W-2 in-house crews with your initial design and installation, your project enters our permanent service database. Every electrical three-line diagram, conduit pathway, and microinverter or optimizer serial number is permanently archived. If your system ever experiences a performance drop, our service department doesn’t have to search for answers or run extensive exploratory testing—we reference your exact digital blueprint and dispatch a technician equipped with the precise parts to resolve the issue as quickly as possible.

Service for Third-Party and “Orphaned” Arrays

With many solar companies–from national brands to local teams–exiting the Colorado market or filing for bankruptcy recently, many Front Range homeowners have been left with “orphaned” solar arrays. If your original installer is no longer in business, Solar Power Pros can provide structural support. However, servicing a system built by an outside contractor requires a unique, highly specialized approach.

Because we lack the original engineering files and permitting records for third-party systems, our service team manages these projects through an Initial Diagnostic Discovery Protocol to establish safety and compliance before performing repairs:

  • Step 1: Confirm Permitting & Interconnection Status: If your project is already fully approved and built from a utility and inspection level, we move on to step 2. If your project has not been approved from a permitting perspective, we’ll need to perform a Permitting & Interconnection Audit with the utility. Solar Power Pros cannot pickup where an old contractors permit, or utility approval were left off, in most cases these will need resubmittal from SPP. We will also need to make sure the structure can adequately handle the additional load on the roofs surface. We physically map the array’s, conduit runs, check the integrity of the roof penetrations, and evaluate the utility interconnection points to ensure they comply with current Colorado electrical & local Code.
  • Step 2: Electrical Baseline Testing: Our technicians perform live electrical testing to confirm the baseline performance and safety of your solar equipment.
  • Step 3: Manufacturer Warranty Alignment: We identify your inverter and panel brands (such as SolarEdge or Enphase) and trace their serial numbers through manufacturer databases to help you recover and preserve any active, factory-backed equipment warranties.

Solar Power Pros Employs Factory-Certified Service Technicians

The shifting economic landscape of Colorado solar has led to an influx of companies trying to survive by pivoting away from installation and into dedicated system repair. However, true diagnostic safety requires specialized manufacturer training.

Solar Power Pros is a veteran-owned business based right here in Centennial, serving Denver’s Front Range. We operate through our own specialized, in-house W-2 employees—we never hand off your system to third-party sub-contractors.


Our technicians hold certified field badges directly from the world’s leading manufacturers, including Tesla, SolarEdge, Enphase, and others. When you choose an authorized service provider, you guarantee that all diagnostic testing and module replacements preserve your remaining long-term manufacturer warranties.


If self-troubleshooting fails to restore your array, you can seamlessly reach out for residential solar service or commercial service O&M.

Still Need Solar Troubleshooting Help?

If your system remains offline or continues to throw red fault codes after executing these standard power cycles, don’t leave your production to chance. Get professional support from the team named EnergySage Installer of the Year in Colorado.

Request Professional Service & Maintenance

Give our Pros a call at 303-797-6527 or request service today.

Service Troubleshooting FAQs

When is the best time to prioritize preventive maintenance for my solar panels?

The ideal time to schedule preventive solar panel maintenance services in Denver is during late winter or early spring (February through April). Homeowners routinely forget about their solar panels during winter and spring, only realizing a critical component failed months prior when a massive summer utility bill arrives.


Don’t wait until the summer heat to fix a production issue. Preventive maintenance is the best maintenance. Checking your system health and scheduling preventive maintenance before seasonal heatwaves strike guarantees your array is fully mission-ready to handle peak production hours and secure your financial return.

In most cases, no. If your inverter shows a steady green light but your app is blank, your system is likely still generating power perfectly. This symptom indicates a breakdown in communication between your internet router and the solar gateway, often caused by a changed Wi-Fi password or router replacement. Visit our brand-specific troubleshooting guide for step-by-step instructions to get reconnected.

No. Heavy Colorado snow loads will temporarily block sunlight and cause your system to enter a temporary sleep mode. Once the sun emerges, the dark glass faces of the panels naturally warm up, shedding snow quickly. Your system will automatically reboot itself once sunlight strikes the cells.


If you’re concerned about winter safety, consider adding Snow Guard to your residential or commercial array. Snow Guard helps prevent snow from sliding off panels in large sheets, keeping your home or property safe. 

Yes, it is highly likely. While Enphase and SolarEdge are the most common modern systems, our certified in-house technicians are highly experienced in testing, diagnosing, and repairing resilient legacy inverters to keep older Front Range systems operating safely and effectively.

Have a Question About Solar?